
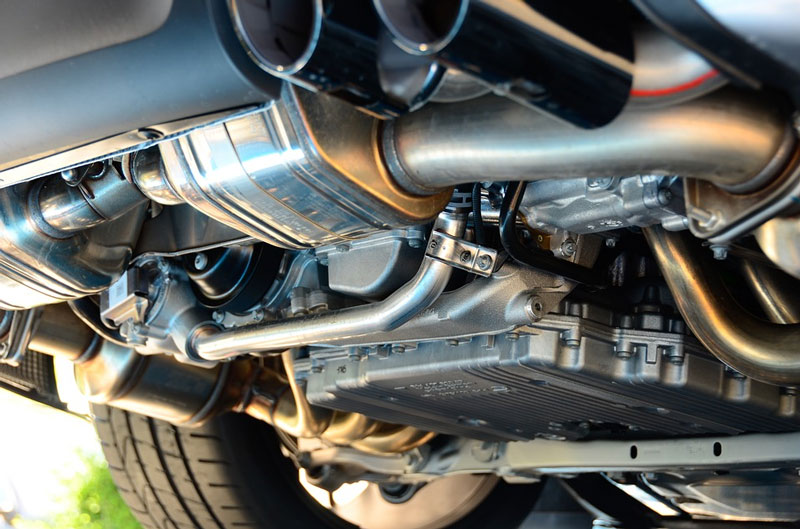
Installing exhaust insulation wrap on your headers and exhaust pipes is an easy upgrade for reducing under-hood temps and maximizing engine power. But how much exhaust wrap do you really need? At Heatshield Products, we’ve got the answer! We’re exploring how to install exhaust wrap for effective and long-lasting results you can count on.
Calculating Your Exhaust Insulation Wrap Needs
When applying heat wrap to your exhaust system, the first thing that you’re going to want to do is work out exactly how much exhaust wrap you need. Figuring out the correct length beforehand can save you from running out of wrap before the job’s done or buying more than you actually need. To calculate the length and width of the exhaust insulation wrap that you need for your car’s exhaust system, you’ll need to jot down the following measurements:
- Pipe diameter (in inches)
- Pipe length (in inches)
- Number of bends less than 45°
- Number of bends greater than 45°
Got your measurements? Great! Head to our exhaust wrap calculator and punch in the numbers for an instant calculation of how much exhaust wrap you’ll need. Please note that our calculations take into account a ¼” overlap on each coil around the diameter of your pipes, so if you want to overlap by a ½-width (we recommend this for industrial and marine applications), you’ll need to add another 25% to the total figure.
How to Install Exhaust Wrap
To install our Lava exhaust insulation wrap on your headers, downpipes, or entire exhaust system, you’ll need the following tools and safety items:
- Gloves
- Safety Glasses
- Dust Mask
- Long Sleeves (optional)
- Bucket or Spray Bottle With Water
- Automotive degreaser
- Exhaust Insulation Wrap
- Stainless-Steel Locking Ties
- Wrench
- Hose Clamp (optional)
- Pliers
- Utility Knife or Heavy-Duty Scissors
Once you’ve gathered your equipment and figured out “How much exhaust wrap do I need?” follow these instructions to install your heat-resistant exhaust wrap:
Remove the Header and Exhaust Pipe
Using a wrench, loosen all of the nuts that are holding the header and exhaust pipes in place and carefully remove — be sure to store all removed nuts and rubbers in a safe place so you can reinstall the parts later. Take out the header and exhaust pipe and place on a piece of cardboard or somewhere you don’t mind getting dirty. Next, clean the surface of the header and pipe with an automotive degreaser and allow to dry completely. Apply a primer if necessary.
Inspect You Header, Manifold, and Pipes.
Always check your exhaust system’s components before installation. As you examine your system, check for any cracks or ruptures in the pipes. While exhaust wrap covers a pipe, it is not designed to seal cracks; it strictly serves as an insulator.
Before you go about learning how to install exhaust wrap, you need to also make sure your exhaust system is clean beforehand. In particular, focus on cleaning off any oil or grease build-up. Leaving any flammable or combustible fluids on the pipe and then wrapping over them with exhaust insulation wrap may cause harmful combustion that’ll definitely slow down your ride — so be sure to remove any residue before installation!
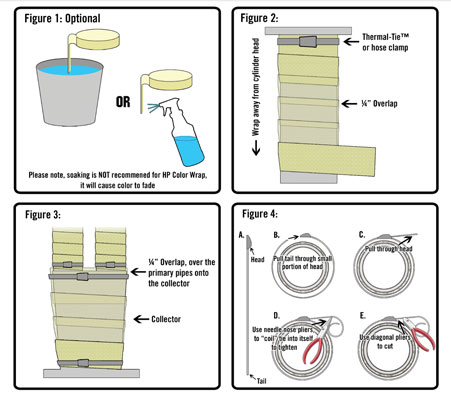
OPTIONAL Pre-Soak or Spray the Insulation Wrap
While it’s not essential, pre-soaking your exhaust insulation wrap for 5 minutes or wetting it with a spray bottle as you go (our preferred method) can make the wrap more stretchy and pliable—this will allow you to achieve a tighter wrap. Damp heat wrap will also stick to itself better as you coil around the pipe.
How to Install Exhaust Wrap on Each Pipe
Which direction you start wrapping your exhaust insulation wrap isn’t actually that important, but we recommend starting at the side closest to the engine. Start your installation by folding the cut end of the wrap under by about ¾” to 1”. This helps minimize fraying and gives the installation a much cleaner and professional look.
With your first wrap around the pipe, make sure to wrap over the folded edge and completely around the pipe. Secure this initial wrap with a hose clamp. For our Lava Exhaust Wrap and Cobra Wrap, it is important to be sure the surged (sewn) side of the wrap is facing outwards (towards you). For other wraps like our Inferno Wrap, Standard Exhaust Wrap, or Black Exhaust Wrap, it does not matter which side is outward.
Once secured, work your way down each pipe, overlapping the exhaust insulation wrap by ¼” so that no heat will escape between the gaps. We recommend using a ¼” overlap for all automotive and motorcycle applications. We only recommend using the 50/50 method (a ½” overlap) on Industrial, Marine, or Heavy Duty high-temp insulation applications. Depending on your application use, check that you’ve taken this overlap amount into account when buying pre-cut exhaust wrap and deciding “How much exhaust wrap do I need?” If you are wrapping directly from the roll, you can keep moving along!
Remain Flexible
No matter how you install your exhaust wrap, always stop your wrapping before the flex pipe or expansion joint. These portions of the exhaust system are designed to move independently of the rest of the system and cannot be wrapped along with the rest of the system. The insulation wrap covering these components needs to be installed separately from the rest of the system. This will help improve the longevity of your exhaust wrap and reduce failure rates.
Use Tape as an Extra Set of Hands
When you get to a junction, cut the exhaust insulation wrap with a couple of inches to spare. Use the same fold under method at the end of this run to secure the wrap. You may even temporarily use and secure the end of the wrap with a piece of tape. The tape can act as a temporary set of hands while you secure the wrap with a Thermal-Tie, tie wire, or hose clamp. Keep in mind, though, you must remove any tape before firing up the engine.
How to Install Exhaust Wrap Top Tip: Retorque the Wrap Again
Going back over a portion of wrapped pipe is a great idea before tightening down that locking tie or clamp. With a gloved hand, grab the wrapped pipe and twist the wrap into itself, making it as tight as possible. If you soaked your wrap, you may see water drip out, much like wringing out a sponge. While the purpose of this step is not to remove the excess water from the wrap, the idea here is to better tighten the wrap onto itself and the pipe. Remember, the tighter the wrap, the less heat that escapes and the greater the benefits. Not to mention, tight exhaust wrap lasts longer than loose wrap!
Secure with Stainless-Steel Locking Ties
Once you finally feel like an expert on how to install exhaust wrap, secure your exhaust insulation wrap masterpiece in place with stainless-steel locking ties every few inches — especially at the pipe ends and around bends.
Secure the ties by threading the pointy end through the smallest part of the head, pull tight, and coil the end of the tie under with the needle-nose pliers. Then, use diagonal pliers to cut off the excess length of the tie; this will reduce bulk and give your pipes a neater appearance.
Reinstall the Header and Exhaust Pipe
Now that you’re done wrapping, reinstall the header and exhaust pipe, replacing the rubbers and tightening the screws evenly until each piece is well-secured. Stand back and admire your handiwork—or, better yet, take your masterpiece out for a cool, smooth, and efficient ride.

A Couple of Things to Be Aware of…
Prepare for Some Smoking While the Wrap Cures
The first time you start up your engine after installing exhaust insulation wrap, you’ll notice that the wrap starts to smoke and smell. Don’t worry—this is just the starchy binders burning off and isn’t toxic to drivers or passengers. Depending on the heat of your exhaust system, this smoking could last from anywhere from 30 minutes to 5 days and will stop once the wrap has cured completely.
Wrapping Your Header May Affect Manufacturer Guarantees
You also need to be aware that many manufacturers won’t guarantee a header that’s been modified with exhaust insulation wrap. Check with your manufacturer before going ahead with calculating “How much exhaust wrap do I need?” to find out their policy.
Shop Exhaust Insulation Wrap that Really Works at Heatshield Products
The experts at Heatshield Products have over 40 years of industry experience, and we know what works when it comes to how to install exhaust wrap. Whereas many heat shield manufacturers will make over-the-top claims about their automotive heat shields, we give you honest and accurate information that comes from real-life testing on the racetrack.
Please refer to our Product Installation Sheet for diagrams to help you work out “How much exhaust wrap do I need?” and to assist you as you complete your exhaust insulation wrap project. Find a distributor for our auto heat shields, wraps, and heat shield tape & fasteners to enjoy cooler temps and increased engine power today!